
Sooner or later most projects require some external input. Usually in the form of reading some switches. This is a topic that is much trickier than it appears. The issue is that switches do not have two clean digital states (high and low) but two completely different states (open and closed). Both the mapping as well as the transition of the states has its pitfalls.
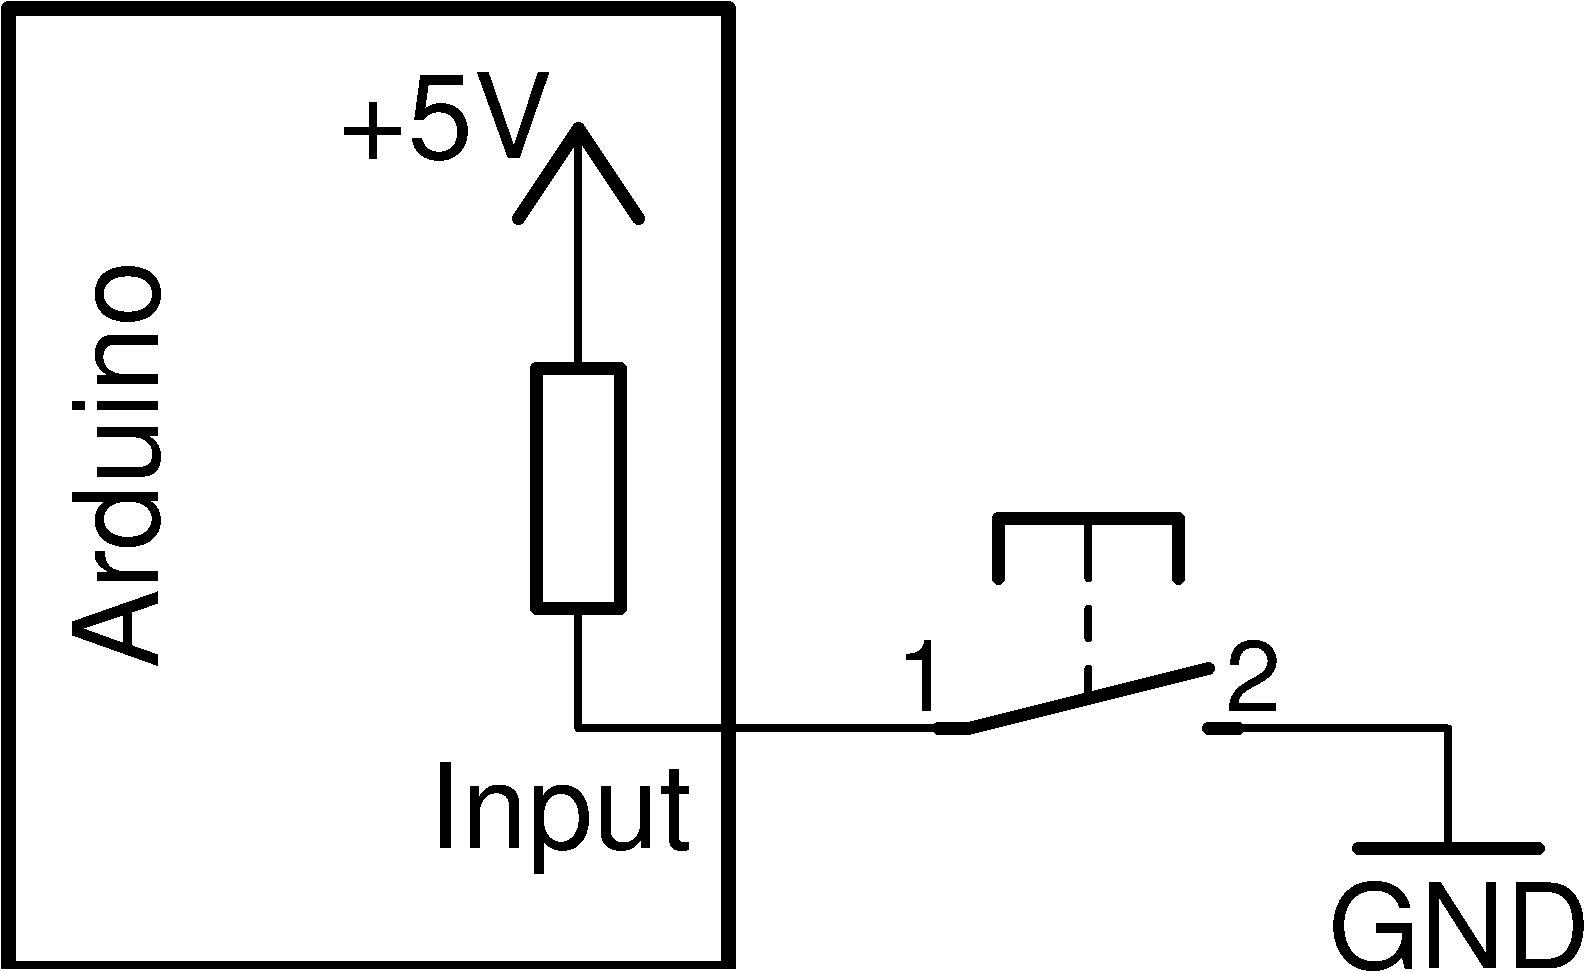
Lets look at the mapping first. Suppose we connect an Arduino input pin with a switch that will close the connection to ground (0V) when pushed. Often this goes with the implicit assumption that the other switch state will give rise to the other pin state. Unfortunately this is not true. See the table below for the full story.
| Switch State | Desired Pin State | Real Pin State |
|---|---|---|
| open | high | floating / undefined |
| closed | low | low |
Once the switch is open the pin is connected to nothing. Thus it will act like a small antenna and may pickup random nice. It may result in either a high reading, a low reading, high frequent switching or in other unintended behaviour. The typical remedy is to add a pull up resistor that pulls the pin to +5V.
The other setup that connects the switch to +5V would require a pulldown resistor to pull the pin to ground. The first scenario is significantly more common since the Arduino features build in pull up resistors but no pull down resistors.
Pullup
However for the Blinkenlighty (if you have the LEDs) connected you always have “implicit” pulldowns.

LED as Pulldown
In case you do not have a Blinkenlighty (or deactivated the LEDs) the pull ups are activated like so
    pinMode(pin, INPUT);
    digitalWrite(pin, HIGH);
Now assume the pull up resistors are active. The next assumption is that now closed corresponds to low and open corresponds to high. Although this is correct it is not the full story. The issue is the switches transition from closed to high. If you push the switch the contacts may not be fully closed immediately. Instead they may bounce for a very short period of time. Although this is usually in the range of some milliseconds or less this is not a short period of time for your Arduino. Thus the Arduino will recognize a short period with several back and forth transitions until the switch finally settles in the new state.
This is where debouncing comes into play. There exist already several solutions to this topic. There is even an example included with the Arduino IDE. This examples evaluates the millis() function. It somehow does its job but I do not like it to much. A somewhat better solution is the debounce library in the Arduino playground. I like the abstraction it provides. However it consumes way more memory than seems fit for this purpose. Still it is a good option if you are not tight on memory.
Even better solutions (if you can read German) are found in a post from mikrocontroller.net.
And of course here comes my solution to this issue. What it features is an abstraction similar to the playground’s debounce library. But at the same time it will use significantly less memory. I will achieve this by means of replacing the debounce class with C++ templates. I also provide an autorepeat function. My debouncer is designed for event driven code. The example below will illustrate how it works. By default it will work with a Blinkenlighty. The two easy modifications for Arduino are commented in the code.
//
//  www.blinkenlight.net
//
//  Copyright 2013 Udo Klein
//
//  This program is free software: you can redistribute it and/or modify
//  it under the terms of the GNU General Public License as published by
//  the Free Software Foundation, either version 3 of the License, or
//  (at your option) any later version.
//
//  This program is distributed in the hope that it will be useful,
//  but WITHOUT ANY WARRANTY; without even the implied warranty of
//  MERCHANTABILITY or FITNESS FOR A PARTICULAR PURPOSE. See the
//  GNU General Public License for more details.
//
//  You should have received a copy of the GNU General Public License
//  along with this program. If not, see http://www.gnu.org/licenses/

#include <MsTimer2.h>

const uint8_t left_button_pin  = 2;
const uint8_t right_button_pin = 3;
const uint8_t lowest_led       = 4;
const uint8_t highest_led      = 19;


uint8_t setInput(uint8_t pin) {
    pinMode(pin, INPUT);
    // do not activate pullups for Blinkenlighty
    digitalWrite(pin, LOW);
    // activate pullups for standard Arduino
    // digitalWrite(pin, HIGH);
    return 0;
}

typedef void (*event_handler) ();

template <uint8_t pin, uint8_t active_state, uint16_t debounce_ms, uint16_t autorepeat_ms, event_handler button_handler, event_handler repeat_handler>
void debounce() {
    static uint16_t count = setInput(pin);

    if (digitalRead(pin) == active_state) {
        if (count < 0xffff) {
            if (count == debounce_ms) {
                button_handler();
            } else if (count == debounce_ms + autorepeat_ms) {
                count -= autorepeat_ms;
                repeat_handler();
            }

            count += 1;
        }
    } else {
        count = 0;
    }
}


namespace cursor {
    int8_t position = lowest_led;

    void on() {
        digitalWrite(position, HIGH);
    }

    void off() {
        digitalWrite(position, LOW);
    }

    void setup() {
        for (uint8_t pin = lowest_led; pin <= highest_led; ++pin) {
            pinMode(pin, OUTPUT);
            digitalWrite(pin, LOW);
        }
        on();
    }

    void left() {
        off();
        ++position;
        if (position > highest_led) {
            position -= (highest_led-lowest_led+1);
        }
        on();
    }

    void left_3() {
        off();
        position += 3;
        if (position > highest_led) {
            position -= (highest_led-lowest_led+1);
        }
        on();
    }

    void right() {
        off();
        --position;
        if (position < lowest_led) {
            position += (highest_led-lowest_led+1);
        }
        on();
    }

    void right_3() {
        off();
        position -= 3;
        if (position < lowest_led) {
            position += (highest_led-lowest_led+1);
        }
        on();
    }
}

void tick() {
    // use active_state HIGH with pulldowns ("Blinkenlighty mode")
    // use active_state LOW  with standard Arduino
    debounce<left_button_pin,  HIGH, 100, 500, cursor::left,  cursor::left_3> ();
    debounce<right_button_pin, HIGH, 100, 500, cursor::right, cursor::right_3>();
}

void setup() {
    MsTimer2::set(1, tick);
    MsTimer2::start();

    Serial.begin(115200);
    Serial.println(F("ready"));

    cursor::setup();
}

void loop() {
    static int8_t previous = cursor::position;

    if (cursor::position != previous) {
        previous = cursor::position;
        Serial.println(cursor::position, DEC);
    }
}
First there is a simple “cursor” visualization that will provide some simple action which we will control by two buttons. Everything that controls the cursor is contained in the cursor namespace. It can be initialized and moved around. One step or three steps to the left or to the right. Further details are not relevant for this example.
Also notice the main loop. It does nothing but push the current cursor position through the serial interface. This serves two purposes. (1) to provide some action for people without Blinkenlighty or Blinkenlight shield. (2) to show that there can be something going on while the debouncing happens in the background.
Lets get to the actual meat of the example. Again I use MsTimer2 Library from the Arduino playground. The setup code makes it call tick() once per millisecond. The tick() function will then dispatch to the two debouncer functions. Notice that this is not one but these are two functions. This is due to the template mechanism. Compiling templates with different parameters gives rise to different functions. This is because from a compiler point of view templates are like “typed macros”. It follows that there will be two static count variables (one per function). Static variables have the nice property that they are invisible outside of the function but they keep state like global variables.
The static variables are the key to the debouncer behaviour. If an active pin state (=pushed button) is observed during the tick, count will be increased. Otherwise it will be reset to zero. Once there are enough “active ticks” the button handler is called. If there are even more “active ticks” counted the auto repeat handler is called and afterwards the count is reset to the same values as after triggering of the push button event. Thus the autorepeat will keep repeating until the button is released.
Also notice what happens if autorepeat_ms == 0. In this case it will never enter the autorepeat part and keep counting till it bumps at 0xffff or the button is released.
The video shows my debouncer in action. Instead of a pushbutton I just touch the IO pins with a wire. This gives usually much more bounce than any switch.
As you can see the debouncer deals with this pretty easily.

